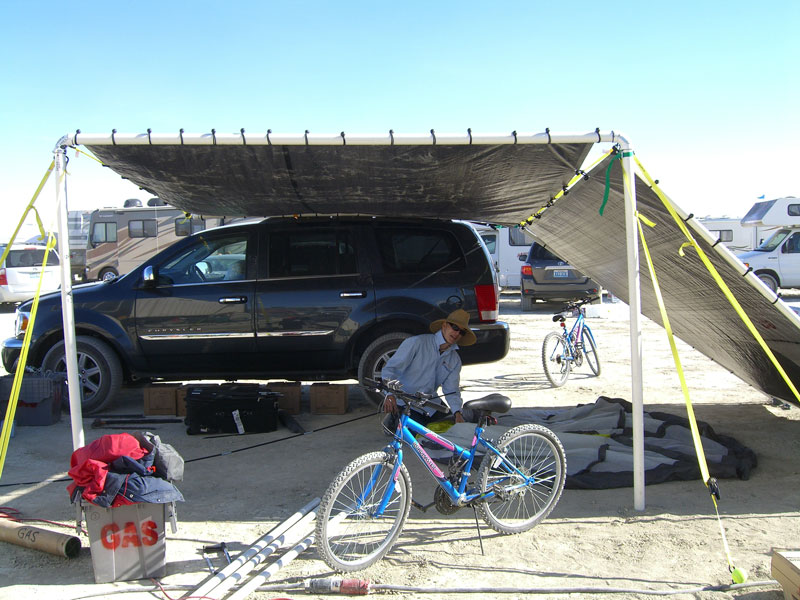
My structure was designed to be inexpensive, provide some shade, and withstand a 60 mph wind. It cost about $300 to build, and it held up pretty well, but it's by no means perfect. Its main defect is that it requires an SUV. The SUV is unattractive, radiates heat, and may annoy neighbors with strict ideas about parking. Also some may consider it cheating, but whatever. It does have a plus side: the playa winds won't be blowing over an SUV.
Another downside is that some of the parts are non-reusable, particularly the PVC, which sucks because PVC is toxic waste. In '07 I found a camp on the playa who wanted it, but my PVC from '08 is still sitting on my basement floor. A certain amount of waste is inherent in BM obviously. If it makes you feel any better, I read recently that most of the fossil-fuel/climate impact of BM is travel, i.e. getting there and back: see Brad Templeton on Green Man.
It's also not the optimal shape for the playa. Low curved shapes have less drag, but from my research they are more complicated and expensive to build. It also doesn't prevent dust at all! You're counting on your tent to keep dust out. My tent had exposed netting on the top, so I hot-glued fabric over the netting and it worked OK. On the plus side the structure breathes, unlike some domes I've been in.
Basically it's a two-tarp lean-to. One tarp is parallel with the ground, we'll call that one the roof. The other tarp slants down from one side of the roof to the ground. We'll call that one the side panel. So you have shade on two sides (the SUV, and the side panel), and above. That leaves you exposed on two sides, so alignment is crucial. The SUV in particular has to be at just the right angle. I did my initial setup at dawn, so that I could be 100% sure where the sun would be. With the side tarp facing east, I had shade from dawn to late afternoon.
The roof tarp is held up along one side by a pipe strapped to the SUV's roof rack. This has some important consequences: 1) if the SUV doesn't have a roof rack you're pwned, and 2) the roof height is limited by the height of the SUV. Note that car rental companies generally prohibit anchoring things to roof racks, so don't tell them about it. If the wind manages to tear the roof rack off it will be expensive, but hopefully something else will fail first. Still you might want to give the roof rack a wiggle before you rent, to make sure it's solid.
The roof tarp is held up along the opposite side by three pipes. I'll call these three pipes the U, because they look like a squared-off, upside-down U. The U consists of two 10' PVC uprights, sitting on rebar stakes, and connected at the top to a single 10' PVC horizontal, via two elbows. I used 2" diameter and was glad I did. The U is held up by a total of six ratchet straps. Three straps connect at each elbow. Two go diagonally down to the ground, attaching to two rebar stakes. The third strap goes horizontally across and attaches to the nearest end of the SUV pipe. Thus the roof tarp can be fastened all the way around, to PVC pipe on two opposite sides, and to ratchet straps on the other two sides, using bungee balls (see below).
So how do you attach three ratchet straps to a 2" PVC elbow? This is crucial; the whole structure depends on it. I mounted a 5/16" threaded steel U-bolt into each elbow, with fender washers and nuts. It might have been overkill, and drilling holes in the elbow does weaken it a bit. The photo below shows the elbow fairly clearly. There's a lot of stuff attached to that U-bolt! The PVC would crack long before the U-bolt gave way.
The SUV pipe (10' x 2") has a 5/16" eyebolt at each end, for attaching stuff to. That's easy, just install the eyebolt in a 2" cap with washers and nuts, and glue the cap onto the pipe. Strap it to the roof rack with 2" cam belts, at least two of them. Be careful to put some thick foam or other padding under the pipe so it doesn't wear away the paint on the SUV's roof.
And what keeps the elbows attached to the pipes? PVC cement. It's awesome stuff, strong as hell, but it's also what makes the structure non-recyclable. Instead you could try drilling holes through the elbow flanges and the pipes, and putting bolts through. Then you'd be able to disassemble it instead of hacking it apart with a saw. However you're asking a lot of the PVC in this case, especially in the hot sun. I chose to play it safe and went with the glue.
The side tarp is also fastened all the way around, to one of the horizontal ratchet straps (running between the U and the SUV pole) at the top, and on the sides, to two 1.5" diameter PVC pipes running to the ground at an angle. It's not visible in the photos, but the bottom edge of the side tarp is attached to another 1.5" diameter PVC pipe lying on the ground. All three pipes are anchored to rebar stakes.
links: